The next Pic shows the back glued to the sides , kerfing in place and reinforcing set in an X pattern for bracing . I have used solid wood cuts for the harder parts of the design as you can see .

The neck is glued up and ready for the band saw .

Gluing and clamping the tone bars in place after the basic shape of the top has been cut


The neck is glued up and ready for the band saw .

Gluing and clamping the tone bars in place after the basic shape of the top has been cut
The finished glued top . Note the "oval sound hole" I messed up the project as you will see soon.

The Neck glued in place with the fret board Fretted and fitted and glued in, The tuner holes have been drilled as well.

The layout of the Pearl inlays at the head angle.

The top glued in place and the unit ready for final sanding for the finish . Note the "diamond sound hole " hey I'm good lol . The color stain under the finger board was done prior to gluing
 I will have pictures of my project comming up as I continue into the finishing stage . Thanx for stopping by and looking over my little project.


 Pained circle above , Top cracked in a dozen places and not repairable . Has to be replaced.
 The
The  The Pic above shows the "reinforcing I glued in to help
  The neck was warped and in bad shape , I sanded it down and used a hand plane to try and straighten the fret board side , it was "partially"
  The back and sides after I sanded and filled cracks and
  The above is the new top , I made it out
  The bracing has been glued in and the "F" holes redone to match the
  View from the

 After staining , during the
  The back of the finished product , Black stain in the wood grain and Cherry stain over that. You can see how the black Painted neck ties in nicely now.
 The front of the finished Guitar . The Top is black stained walnut and the fingerboard is Cherry stained . So the whole effect turned out well.
 I made a pearl pick guard from a sheet I purchased from Stewart MacDonald and
  You can see parts of the Label in the pic through the sound hole . It says "
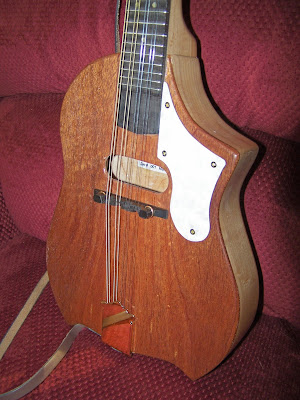

 The following picture shows the head being laminated around the sides with the Mahogany to match the stripes in the neck and the top. Notice the fine precision clamping mechanisms that are keeping
  After that was glued and trimmed I finally was able to do some assembly I have screwed in the tail piece and the Tuning pegs in the head . I set the bridge in place and put strings on it. I wanted to see how well the sound was at this point before I started the Lacquer. If sanding was needed now is the time to do it. As you can see through the sound hole , one of my braces is
  The unit is tuned and checked for sound. I have spent a little extra and purchased the better quality tuning pegs and tail piece in a polished brass . The tuning keys have pearl knobs. Notice the location of the ebony bridge in relation to the sound hole . Remember I said earlier in a post the distance from the fret with the (2 ) pearl inlay dots to the nut ( bone piece at head ) is approx same
  The sound is actually quite good considering its my first attempt at a mandolin. I am rather happy at this point and quite relieved. Time for
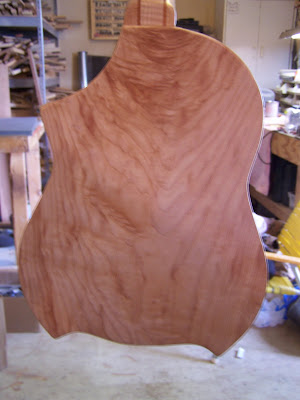


 Each Fret wire is cut over sized and hammered into the
  In the Pic below I have drilled and glued in the pearl inlay dots I chose for my fret board. These are set in the center of the # 3 / 5 / 7 / 10 / 12 / 15 frets . You will notice the 12
 In the pic below I have fitted the fret board to the neck of my Mandolin and have it glued in place . To the left end you can see the
  The below pic shows the Bridge that set at the back of the Mandolin and holds the string spacing properly. The distance from the " Nut" of the Mandolin ( the white bone glued in the neck at
 The below pic shows the unit
  In the next pic I have made the tension rod cover from the
 If you look closely you can see the notched "
 Also you can see in the above pic that I have cut the headstock to receive the "Tang" from the neck to create a solid joint. The back is solid an the tang sits down and is glued to the back as well as the insides to make a solid joint.
 I place 3 across , and learned that two would have been enough probably . Oh well next time.
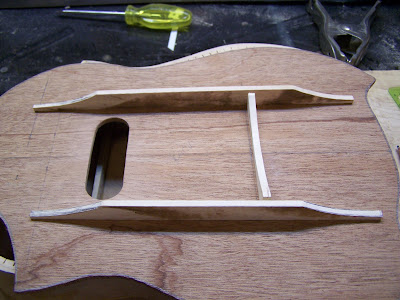
 Below You can see I have glued the neck into place . Why I
  You can see the top being glued in and the neck set . If you look closely you will see the Hard Maple strip in the neck I glued in to cover the Tension Rod.