As we get into post # 4 we are applying the back to the Mandolin outside shell . Remember I said I let the Tension off the unit a bit and allowed it to find its natural shape . You will see that come to the fore later in another post. Below I have cut the back slightly larger than the outer shape and am gluing it in .
 If you look closely you can see the notched "Kerfing " that helps to have glue area needed to keep the Mandolin together . The thickness of the back should be no greater than .125" thick . Actually a bit thinner , around .105 is desired at finish for better sound.
 Also you can see in the above pic that I have cut the headstock to receive the "Tang" from the neck to create a solid joint. The back is solid an the tang sits down and is glued to the back as well as the insides to make a solid joint.
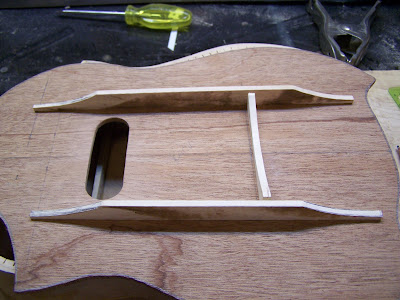
The Picture below shows the placing of the supports across the back of the Mandolin. I used Spruce , its light and strong and recommended for this area. as you can see the supports are feathered out towards the end. This helps reduce mass and weight , and since you have " Kerfing at the edges it isn't required that the be full thickness.
 I place 3 across , and learned that two would have been enough probably . Oh well next time.
If you look closely you can see the notched "Kerfing " that helps to have glue area needed to keep the Mandolin together . The thickness of the back should be no greater than .125" thick . Actually a bit thinner , around .105 is desired at finish for better sound.Also you can see in the above pic that I have cut the headstock to receive the "Tang" from the neck to create a solid joint. The back is solid an the tang sits down and is glued to the back as well as the insides to make a solid joint.The Picture below shows the placing of the supports across the back of the Mandolin. I used Spruce , its light and strong and recommended for this area. as you can see the supports are feathered out towards the end. This helps reduce mass and weight , and since you have " Kerfing at the edges it isn't required that the be full thickness.
I place 3 across , and learned that two would have been enough probably . Oh well next time.The Pic Below shows the placement of the " Tone Bars " this is not a complete pic . After the pic was taken I added another cross bar , the short one approx 3/4" from the sound hole and I scalloped the long ones between those shorter cross pieces so that it reduced mass and added strength and tone. The more material taken out will change the sound of the face as its done.
Again the shape is cut slightly larger than the outer ring and this allows for the best gluing and the remainder can be sanded flush at a later time
 Below You can see I have glued the neck into place . Why I didn't get pics of that I Cant remember . I really thought I did. Anyway The tang was glued in and then I drilled 2 holes on either side about 1" deep so that half the hole was in the tang and half in the headstock . I then glued a dowel into that hole , this helps lock the neck into place . Works like a square key on a motor shaft. sorry I really thought I had pics of that.
 You can see the top being glued in and the neck set . If you look closely you will see the Hard Maple strip in the neck I glued in to cover the Tension Rod.
Again the shape is cut slightly larger than the outer ring and this allows for the best gluing and the remainder can be sanded flush at a later time
Below You can see I have glued the neck into place . Why I didn't get pics of that I Cant remember . I really thought I did. Anyway The tang was glued in and then I drilled 2 holes on either side about 1" deep so that half the hole was in the tang and half in the headstock . I then glued a dowel into that hole , this helps lock the neck into place . Works like a square key on a motor shaft. sorry I really thought I had pics of that.You can see the top being glued in and the neck set . If you look closely you will see the Hard Maple strip in the neck I glued in to cover the Tension Rod.The Next Post will show the Fret Board as well as the basic Glued Mandolin.
Thank You for stopping by and looking at my little project.


2 comments:
Holy cats, its looking like a musical instrument! I bet everytime you see someone smash a guitar on stage you wince... I would... So you wanna go for a bus ride with the rest of us crazy people? I bet the candle lady would love a day of peace... But you have to wear a helmet, because your a newbie....
I still have my helmet and special jacket from high school ROFLMAO
Post a Comment