 The following picture shows the head being laminated around the sides with the Mahogany to match the stripes in the neck and the top. Notice the fine precision clamping mechanisms that are keeping everything aligned while the glue dries ? I tell ya nothing but the best for this WudWerker.
 After that was glued and trimmed I finally was able to do some assembly I have screwed in the tail piece and the Tuning pegs in the head . I set the bridge in place and put strings on it. I wanted to see how well the sound was at this point before I started the Lacquer. If sanding was needed now is the time to do it. As you can see through the sound hole , one of my braces is visible ! ( mistake # ...... lost count )
 The unit is tuned and checked for sound. I have spent a little extra and purchased the better quality tuning pegs and tail piece in a polished brass . The tuning keys have pearl knobs. Notice the location of the ebony bridge in relation to the sound hole . Remember I said earlier in a post the distance from the fret with the (2 ) pearl inlay dots to the nut ( bone piece at head ) is approx same distance from same fret to bridge .
 The sound is actually quite good considering its my first attempt at a mandolin. I am rather happy at this point and quite relieved. Time for disassemble and Lacquer . The first pic is the back of the mandolin . The wood grain is quite beautiful and I am glad I found that particular piece.
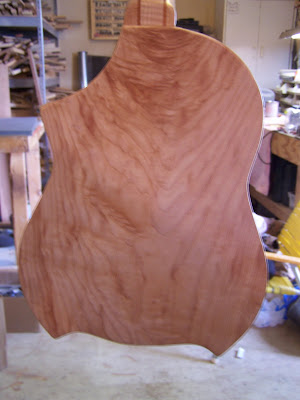
I have taped off the fret board with 3m paper tape and have started spraying at this point . There are ( 9 ) coats of Lacquer on this mandolin , each sprayed , allowed dry time of 3 hrs , sanded lightly, and sprayed again, etc.... etc... 9 times

The top during spraying and below the neck . You can see the mahogany strips are showing quite nicely .

I hope you have found my project enjoyable . Next post I will show you the final assembled mandolin . Thank you for stopping by.


3 comments:
Rubber Bands??? Reminds me of a song "Rubber band man", ya I know you would know that one, your older than dirt. Wow, the grain on that is lovely, I still cant believe that you have made this it's just amazing. Oh, don't go around with your head all big, candle lady will never forgive me...I would like to hear it...PLEASE?
There will be a short vid of it being played after all the posting is done i promise
wow I am so impressed I know that is all I can say. So how are you going to get this into the hands of a fine musician and then become the hot item for all the country musicians?
Maybe Heidi can be your agent.
Post a Comment