As we get into post # 4 we are applying the back to the Mandolin outside shell . Remember I said I let the Tension off the unit a bit and allowed it to find its natural shape . You will see that come to the fore later in another post. Below I have cut the back slightly larger than the outer shape and am gluing it in .
 If you look closely you can see the notched "Kerfing " that helps to have glue area needed to keep the Mandolin together . The thickness of the back should be no greater than .125" thick . Actually a bit thinner , around .105 is desired at finish for better sound.
 Also you can see in the above pic that I have cut the headstock to receive the "Tang" from the neck to create a solid joint. The back is solid an the tang sits down and is glued to the back as well as the insides to make a solid joint.
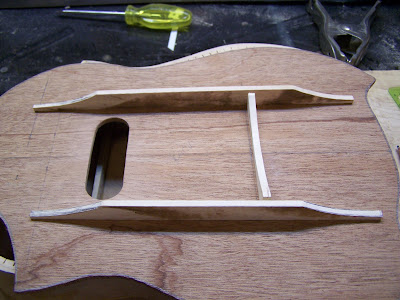
The Picture below shows the placing of the supports across the back of the Mandolin. I used Spruce , its light and strong and recommended for this area. as you can see the supports are feathered out towards the end. This helps reduce mass and weight , and since you have " Kerfing at the edges it isn't required that the be full thickness.
 I place 3 across , and learned that two would have been enough probably . Oh well next time.
If you look closely you can see the notched "Kerfing " that helps to have glue area needed to keep the Mandolin together . The thickness of the back should be no greater than .125" thick . Actually a bit thinner , around .105 is desired at finish for better sound.Also you can see in the above pic that I have cut the headstock to receive the "Tang" from the neck to create a solid joint. The back is solid an the tang sits down and is glued to the back as well as the insides to make a solid joint.The Picture below shows the placing of the supports across the back of the Mandolin. I used Spruce , its light and strong and recommended for this area. as you can see the supports are feathered out towards the end. This helps reduce mass and weight , and since you have " Kerfing at the edges it isn't required that the be full thickness.
I place 3 across , and learned that two would have been enough probably . Oh well next time.The Pic Below shows the placement of the " Tone Bars " this is not a complete pic . After the pic was taken I added another cross bar , the short one approx 3/4" from the sound hole and I scalloped the long ones between those shorter cross pieces so that it reduced mass and added strength and tone. The more material taken out will change the sound of the face as its done.
Again the shape is cut slightly larger than the outer ring and this allows for the best gluing and the remainder can be sanded flush at a later time
 Below You can see I have glued the neck into place . Why I didn't get pics of that I Cant remember . I really thought I did. Anyway The tang was glued in and then I drilled 2 holes on either side about 1" deep so that half the hole was in the tang and half in the headstock . I then glued a dowel into that hole , this helps lock the neck into place . Works like a square key on a motor shaft. sorry I really thought I had pics of that.
 You can see the top being glued in and the neck set . If you look closely you will see the Hard Maple strip in the neck I glued in to cover the Tension Rod.
Again the shape is cut slightly larger than the outer ring and this allows for the best gluing and the remainder can be sanded flush at a later time
Below You can see I have glued the neck into place . Why I didn't get pics of that I Cant remember . I really thought I did. Anyway The tang was glued in and then I drilled 2 holes on either side about 1" deep so that half the hole was in the tang and half in the headstock . I then glued a dowel into that hole , this helps lock the neck into place . Works like a square key on a motor shaft. sorry I really thought I had pics of that.You can see the top being glued in and the neck set . If you look closely you will see the Hard Maple strip in the neck I glued in to cover the Tension Rod.The Next Post will show the Fret Board as well as the basic Glued Mandolin.
Thank You for stopping by and looking at my little project.

 I strongly recommend the plastic footed claps as you see below , the Quick Grip Type . The others will leave marks that are very hard to sand out , as I discovered the hard way .
 After the bending and shaping was done I moved to an Internal Mold as shown below to fit the parts together . I have said they will hold their shape,
  These parts are being Glued into place in this Jig at this point , so that when its done you have the outer ring made up of the 1/8" side parts as well as the Tail Piece and Head Stock.
 After the Sides and Ends have been glued together I started
  I suspect most will have the unit in the Jigs until the back is glued in place . I however chose to allow the sides to expand and move to the exact figure that the bends took them to and then applied it to the back. This was a choice I made to let any stress that had been created from the above


 After the tension rod is set , the top part of the neck is then

 I made a pattern for the back and face based on a combination of a couple different Mandolins found on the Internet and came up with the following design , I pasted the drawings on Masonite and used that for my design as you can see in this pic

 The tail Block I cut from solid maple as well and it is approx 3/8" thick so that there is adequate strength when the strings are mounted and the pressure is applied . The LAST thing I wanted was for the unit to pull apart because i had made something to thin. I had several people tell me that to much solid wood would hurt the sound , so it was a labor of FAITH in what I did here . And i am Happy it paid off !
 The next sets of pictures show the neck. I Have already glued the Hard Maple Boards from the same blank together , and as you can see I have included red Mahogany strips in between to accent the Top . These strips are from the same board I am making the Top From. I turned the grain in opposite directions on the Hard Maple so that the " Natural " tendency of the board to warp would be working against itself to help maintain a straight neck.
 I have glued the " Ears" in Place after making the rough cut on my band saw so that i have the basic shape , albeit quite over sized at this point . A LOT of sanding and measuring to be done as you will see in future post.


 If you look close you can see the Neck Is Broke off the bowl at the heel of the neck . Looks like a small crack and around the sound hole by the finger board its caved in almost 1/2" look


 Opening The Doors You See The Dart Board Mounted To Cork That Has Been Glued To The Plywood Backing . The Sides Of The Cabinet Are Oak And It Is Approx 3" Deep . Because Of The Ceiling Height In The Basement I Was Forced To Mount The Dartboard Higher In The Cabinet To Make The regulation Height And Still Get It Wall Mounted.
 As You Can See The Unit Is Lagged Into The Basement Wall With Large Bolts Since We Have Concrete Walls That Was Necessary . The Top Of The Cabinet Is 1-1/2" Below Ceiling Level , Which I Was Afraid Would Cause Problems in Shooting . However It Seems To Be Fine.